What are layers?
The layers are like a stack of transparencies one on top of the other. In the bottom layer you could put the background like a sky, in a layer above that perhaps a grassy field mid-ground, and in another layer above that perhaps your foreground with a robotic shark.
The advantage of separating these elements into different layers is that you can make changes in one layer without destroying or messing up the contents of the other layers. So maybe you change your mind and want a hamster instead of a shark. Without layers you'd have to redraw that part of the grassy to cover up the shark before drawing the hamster. With layers you just clear the foreground layer.
Layers panel
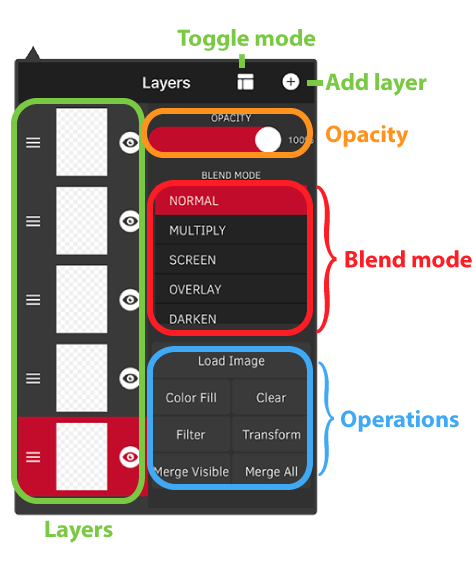

Layers are on the left of the panel. The selected layer is in blue and all your drawing goes into that layer. Just tap to switch between layers. You can poke the eyes left of each layer to hide or show them. On the right of each layer are grippers. Tap and hold a gripper and the layer will lift up letting you move it up and down to rearrange the order.
On the right are settings and operations for the selected layer.
Tap the Toggle mode button to switch to an Alernate mode of the layer panel with layer names. Tap the (i) icon to reveal individual layer settings and operations. Choose color tabs to help organize your layers at a glance. Use whichever mode works best for your workflow and preferences.
Opacity lets you fade the selected layer in and out.
Blend modes change how the selected layer is composited on top of the layers beneath it. Each has different common uses and you can also try different ones and see what interesting effects you get. You'll find these same modes in nearly all digital art applications and can read up more on them at the Blend modes Wikipedia page.
Operations buttons provide tools to manipulate the layers.
| Load image | Import a photo into the layer or download one of the community templates. |
|---|---|
| Color fill | Fill the layer with a solid color. |
| Clear | Reset the layer so it is blank. |
| Filter | Apply one of many filters like blurring or color adjustment. |
| Transform | Move, rotate, scale, flip, and tile the layer. |
| Copy down | Duplicate the contents of the current layer and blend on top of the layer below. |
| Merge down | Blend the contents of this layer onto the one below then clears the layer. |
When the bottommost layer is select the Copy down and Merge down buttons change to Merge visible and Merge all.
| Merge visible | Blends all visible layers together and puts the result in the bottom layer. |
|---|---|
| Merge all | Combines all layers together similar to exporting the sketch as a photo. |
Layer transform
Tap the layer transform button in the layers panel to switch into layer transform mode. In this mode use two fingers to move, rotate, and scale the current layer. Tap with three fingers to reset the layer back to its original position and size.
To squash or stretch your layer drag one of the eight handles surrounding the layer.
Tap and hold one of the corner handles for a second and it will animate and switch to perspective warping mode. As you move the handle around then it will move the layer in 3D perspective.
Similarly if you tap and hold one of the four edge handles for a second it will animate and switch to shearing mode. As you move the handle around then it moves that whole edge with it.
Layer filter
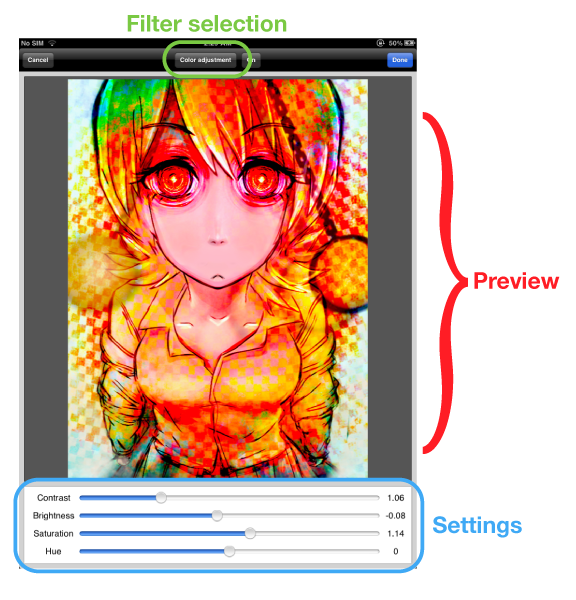
Filters let you apply different effects to your layers like color and contrast adjustments, blurs, and pixellation. You can also quickly add a noise or a vignette to your layer here. Just tap the Filter selection button to pick from a list of all the filters available.
Each filter has different Settings that can be adjusted at the bottom of the screen.